Great pour-over comes down to a repeatable recipe and one master variable: the grind. The standard specialty-coffee starting point is a 1:16 ratio — about 30 grams of coffee to 500 grams (500 ml) of water — ground medium, brewed with water just off the boil (around 200°F), and poured in slow stages over about three minutes after a short bloom. Nail an even grind, a wet bloom, and a steady pour, and you’ll make a cup as clean and bright as most cafés serve. The honest takeaway that separates good pour-over from fussy pour-over: when the cup tastes off, you fix it at the grinder first, not by changing five things at once.
That’s the whole method. Everything below is how to hit that recipe reliably, and how to read the cup when it misses.
The recipe at a glance
These numbers are the widely taught specialty-coffee convention, not a lab result of ours. Treat them as a starting point, then adjust to taste.
- Ratio: about 1:16 — for example, 30 g of coffee to 500 g of water. Weigh both on a scale; it’s the cheapest upgrade to consistency you can make.
- Grind: medium, roughly the texture of table salt — coarser than espresso, finer than French press.
- Water: about 195-205°F, just off the boil. Let a kettle rest around 30 seconds after it stops boiling.
- Bloom: wet the grounds with about twice their weight in water (~60 g) and wait 30 to 45 seconds while the coffee releases carbon dioxide and puffs up — that’s the “bloom.”
- Pour: add the rest in slow, steady stages (or one slow spiral), keeping the bed level, until you reach about 500 g total.
- Taste and adjust: too fast, sour, or thin means grind finer; too slow, bitter, or muddy means grind coarser. Change one variable at a time and re-brew.
Total brew time — from the first drop of the bloom to the last drip — should land somewhere around 2.5 to 4 minutes. If you’re wildly outside that window, the grind is usually why.
Why the grind is the master variable
If you take one idea from this guide, make it this: grind size controls almost everything about the cup. Pour-over works by letting hot water drain through a bed of coffee under gravity, and how fine you grind decides how much resistance that water meets on the way down. That resistance sets the flow rate, and the flow rate sets the extraction — how much flavor actually dissolves out of the grounds before the water runs off.
Grind too coarse and water rushes through the bed, under-extracting: the cup runs fast, tastes sour and thin, and feels weak. Grind too fine and water stalls, over-extracting: the brew crawls, drips forever, and turns bitter and muddy. The sweet spot in between is where the flow, the time, and the flavor all line up.
This is also why an even grind matters more than which dripper you own. A burr grinder crushes beans to a consistent size, so the whole bed drains at one predictable rate — which is exactly what makes the recipe repeatable. A blade grinder chops beans into a mix of dust and boulders; the dust over-extracts and clogs while the boulders barely give anything up, and no recipe can fix an inconsistent grind. Our grinder guide is written for espresso, but the burr-grinder principle is identical here — just use a medium setting instead of espresso-fine. If you’re weighing where to spend, the best coffee grinders for espresso is the highest-leverage read in this whole cluster.
Make a pour-over, step by step
Once your recipe is set, the routine is quick and calm. Here’s the full sequence for a single carafe or large mug.
1. Boil water and weigh your beans
Bring your water to a boil, then let it settle for about 30 seconds so it drops into the 195-205°F window. While it rests, weigh out about 30 grams of whole beans for 500 grams of water. A scale is doing the real work here — eyeballing the dose is the fastest way to a cup you can’t reproduce.
2. Rinse the filter
Set the paper filter in your dripper and pour hot water through it into the vessel below. This rinses away the papery, cardboard taste that dry filters can leave, and it preheats the dripper and carafe at the same time. Dump that rinse water before you add coffee.
3. Grind fresh and level the bed
Grind immediately before brewing — ground coffee goes flat within minutes. Grind at medium, straight into the filter, then give the dripper a gentle shake or tap so the bed sits flat and even. Set the whole thing on your carafe or mug on the scale, and tare it to zero.
4. Bloom
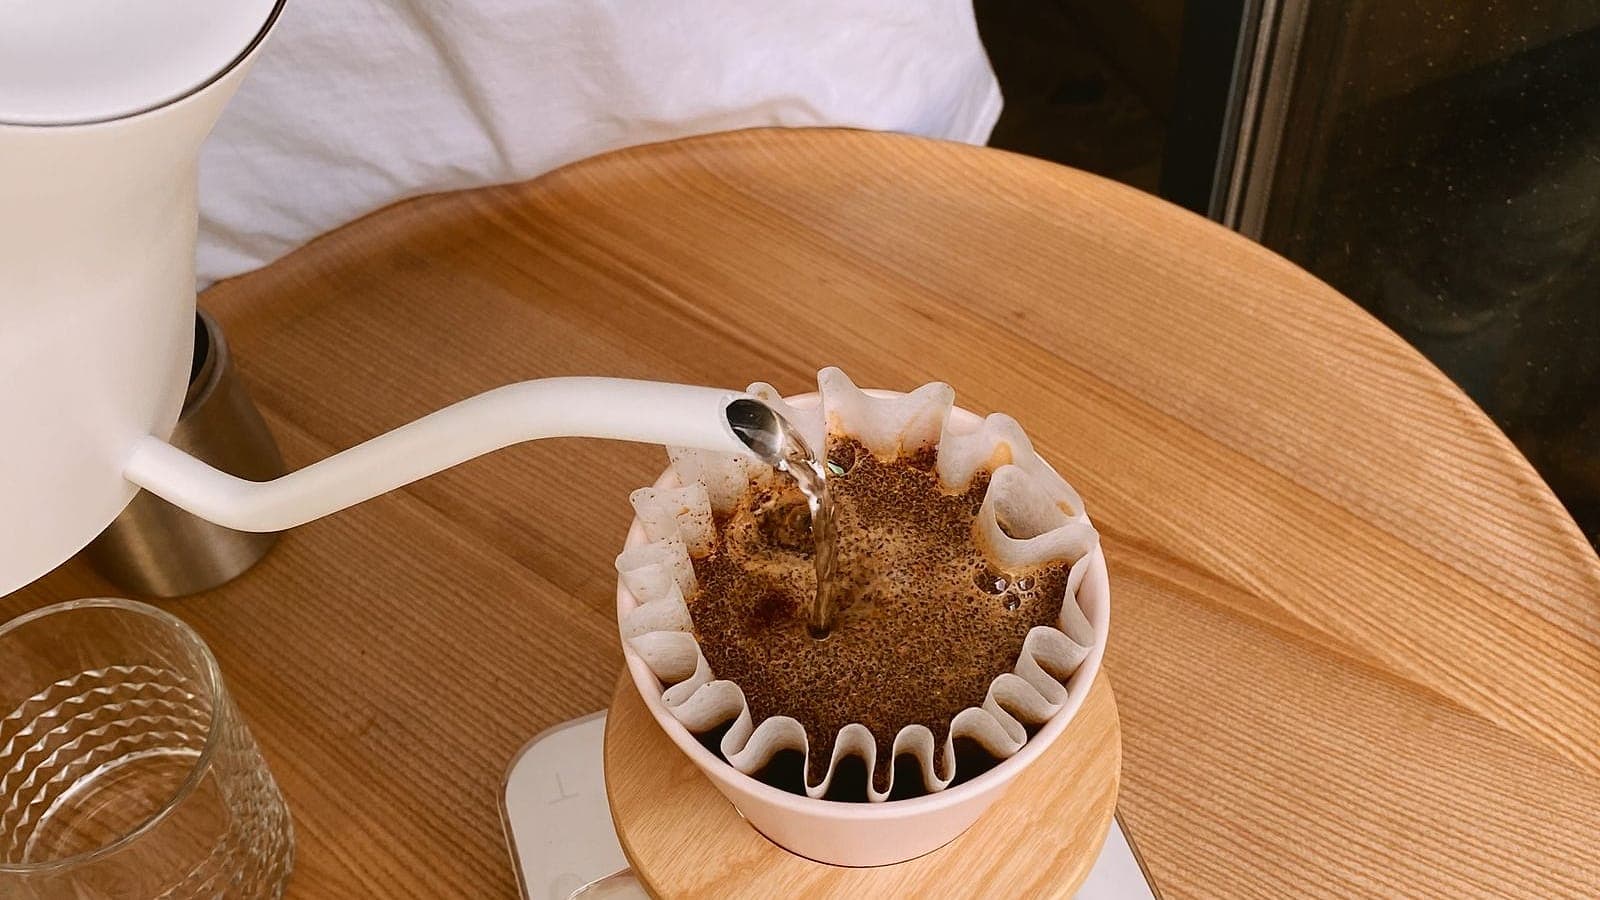
Start your timer and pour just enough water to wet all the grounds — about twice the coffee’s weight, so roughly 60 grams. Fresh coffee will visibly swell and dome as trapped carbon dioxide escapes; that puffing is the bloom. Wait 30 to 45 seconds. Skipping this step is the most common reason a home pour-over tastes uneven, because that gas would otherwise push water away from the grounds mid-brew.
5. Pour in slow stages
Now add the rest of the water in slow, steady stages — or one patient spiral — pouring from the center outward and keeping the water level up without flooding it over the rim. The goal is to keep the bed flat and fully saturated the whole time. Aim to reach about 500 grams total. A gooseneck kettle makes this dramatically easier because it lets you control exactly where and how fast the water lands.
6. Let it draw down
Stop pouring at your target weight and let the last of the water drain through. When the bed looks flat and slightly damp rather than soupy, you’re done. Check the clock: a total time around 2.5 to 4 minutes usually means the grind is in the right neighborhood.
7. Taste, then adjust the grind next time
Give the carafe a gentle swirl, pour, and taste. That taste is your feedback: sour and thin says grind finer next time; bitter and heavy says grind coarser. Change one thing, brew again, and you’ll close in on your cup within a couple of tries.
Cone vs. flat-bottom: which dripper
The shape of the dripper changes how forgiving the brew is. A conical dripper like the Hario V60 funnels water down to a single large hole at the point, which gives you more control over flow — and makes the cup more sensitive to how evenly you pour. Hario’s own design leans into that: the cone shape, spiral ribs, and big opening are built to let you steer the brew.
A flat-bottom dripper like the Kalita Wave spreads the water across a level bed and meters it out through three small holes, so small pouring mistakes matter less. That makes it the more forgiving, consistent choice, and the easier place to start.
The Chemex is a cone with a twist: its signature is a much thicker bonded paper filter that traps more oils and fine particles, brewing an exceptionally clean, bright carafe. Cleaner cup, but a slower draw that rewards a slightly coarser grind. There’s no single “best” here — it’s a match to how much you want to fiddle. Our full best pour-over coffee makers guide walks through the trade-offs.
Common pour-over faults and how to fix them
When a cup misses, resist changing three things at once. Match the symptom to the most likely cause, make the one adjustment, and brew again.
| Symptom | Likely cause | Fix |
|---|---|---|
| Runs too fast; sour, thin, weak | Grind too coarse (under-extracted) | Grind finer; slow your pour and keep the water level up |
| Stalls or drips slowly; bitter, muddy | Grind too fine (over-extracted) | Grind coarser |
| Uneven, patchy, or channeled bed | Aggressive pour or a dry, tilted bed | Pour more gently, keep the bed flat, and rinse the filter first |
| Weak or watery cup | Dose too low or grind too coarse | Raise the dose or grind a little finer |
| Papery, cardboard taste | Unrinsed paper filter | Rinse the filter with hot water before brewing, then dump it |
Notice how many of those fixes are “adjust the grind.” That’s not a coincidence — it’s the master variable doing its work.
What you actually need
You don’t need a café’s worth of gear to make excellent pour-over. You need five things:
- A dripper and its matching filters — cone or flat-bottom, whichever suits how hands-on you want to be.
- A scale for weighing coffee and water. This is the single biggest jump in consistency for the least money.
- A kettle — a gooseneck model helps you pour slowly and precisely, though it isn’t strictly required to start.
- A burr grinder, set to medium. The make-or-break tool, for the reasons above.
- Fresh beans, ideally within a few weeks of their roast date.
New to buying a dripper and not sure where to start? Our roundup of the best pour-over coffee makers and the hub of the best coffee makers walk through the options. Curious how this method compares to espresso or drip? See our explainer on espresso vs. coffee. And if you’d rather pull the espresso version of this recipe, we’ve got a companion guide to pulling a perfect espresso shot.
How we researched this
Cookloom is a new site, so we’re transparent about where this comes from: the recipe here isn’t our own lab result, it’s the standard specialty-coffee convention taught across the field. We cross-checked the technique — the ~1:16 ratio, the medium grind, the just-off-the-boil water, the 30-to-45-second bloom, and the taste-to-grind troubleshooting logic — against established, widely referenced sources, including Counter Culture Coffee’s guide to pour-over. The dripper design details come from the makers themselves — Hario on the V60’s cone, and Chemex on its thicker bonded filter. Where those sources agree, we’ve presented the guidance as convention rather than as a measurement of our own.